My painting progress has been...abysmal, but I thought it might be interesting to set the scene for the Russian invasion, and the army that will do it:
Firstly, they had had colonies all along the Alaskan, Canadian and US west coast as far down as Fort Ross, about 90 pr so miles north of San Francisco. The town of the time has been superseded but the fort has been preserved (see picture below).
.jpg/1200px-Russian_chapel_at_Fort_Ross_(2016).jpg)
Fort Ross (Rus) about 90 miles north of San Francisco (courtesy Wikpedia)
Anyway, the area was sold in 1841, to a John Sutter, soon to be renowned for the discovery of gold at his lumber mill in the Sacramento valley. Not only that, some Russian historians assert the sum was never paid; therefore legal title of the settlement was never transferred to Sutter and the area still belongs to the Russian people!
Add to this that after the Crimean Wars Russia were desperately trying to build up the state coffers. I asked the Oracle of All Wisdom (Chat-GPT) why one would not reconquer the gold bearing areas of the US West while the Americans were tearing each other apart? It said (and I quote):
If Russia had access to California’s gold after taking control of the region during the American Civil War, it would have a substantial financial and strategic advantage. The gold could be used to fund military operations, stabilize the Russian economy, and exert geopolitical influence.
That is the good news, and provides a perfect (and profitable) cassus belli...but its not all plain sailing
However, Russia would also face significant challenges in maintaining control over California, including long supply lines, potential local resistance, and the need to fend off Union attempts to retake the region. The outcome would depend on Russia’s ability to manage these logistical, military, and political challenges effectively.
....so it was clear it had to be self sustaining. Between me and Chat GPT we decided we had to take San Francisco as well.
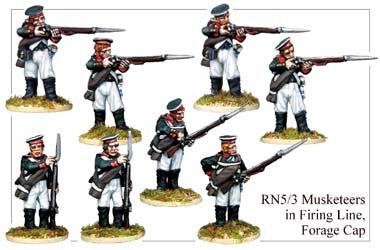
Secondly, building the army from the limited Epic Warlord 13.5mm troops available. One can bodge quite a lot of the Russian 1860's army with 1815 Prussian Landwehr infantry, as they also wear the beloved Russian forage cap and sling a greatcoat and at 15mm scale that works. By the way, the cap was also often worn in action by Russians in the Napoleonic Wars, so the 1860's Russian army I'm building can also be used for the 1812+ .....see pic below. If Foundry do them, it must be right :)
In the foreground of the picture below (Osprey book on Russo Turkish War of 1877) is a Russian Dragoon of the 1870s. The kepi had come in by the mid 1860's (it was quite the fashion in armies worldwide). He looks a lot like like a Union cavalryman, and a Union cavalryman looks a lot like him when painted green. Behind him is a Russian infantry drummer of 1877, compare that to the 1812 figs above.

The Union cavalry guys come from the Warlords Epic ACW Zouave set, so I now also have some Zouave figures that need using, The picture below shows Russian units in the Circassian campaigns (it's part of a painting "They Attack Unaware" by Vasily Vereshchagin). The Circassian campaign was largely over by 1863, so where better to re-deploy some grizzled grognards poste haste in 1864 than California? Of course, the long white hot weather tunic will be replaced by green winter jackets in the USA. And at 13.5m scale that's as good an excuse for Zouave figures as I've ever seen!

To make bodging even more believable, 1860's Russia collaborated fully with me.
- Styles went in and out quite fast in the Crimea to Russo-Turkish War period as the army was in huge flux. Lots of different gear woukd have co-existed, and they only replaced stuff as it wore out so they were slow to change uniform.
- Pan-Slavism was becoming A Thing so units got to be able to select dress far more flexibly in this period, leading to increasing use of looser trousers and long tunics in Russian armies, and preference for the Slavic forage cap over European style headgear.
- Also, uniforms and equipment were supplied at a regiment level from local manufacturers, so it did actually vary quite a bit. Also, on campaign they would use local styles as "official" battledress wore out (hence 2 Cossack equipped Russian line infantry regiments in the Crimean war had red shakoes, for example).
The last bit of the jigsaw puzzle is "How would an 1860's Russian army in America be organised, and what stats would you give it in an American Civil War game?. I've been researching the changes in teh Russan army from the Crimea to the Russian Civil War, 1864-66 is a sort of midpoint.
Firstly, how were they structured and organised? Here are some interesting datapoints.
- In theory they shifted from Corps to Brigade focus, in practice they had Corps structures even in 1877 and everything below was fairly similar to Crimean (even Napoleonic) Wars ones.
- The shift to rifled weaponry -the bulk infantry have the standard weapon of the day, so rifle muskets in the 1860's, but specialist separate Jaeger units (only a few battalions existed) are given the best weapons of the day (by mid 1860s, breech loading rifles). They also made a lot of brass rifled cannon (like Civil War "Napoleons")
- Between Crimea and the Russo Turkish war, all the Dragoon regiments are turned into mounted infantry. Cossacks stay much the same, Hussar front ranks are given lances. Only the Cuirassiers remain "Heavy" cavalry.
- Tactically, they still believe in "General Bayonet" - even after analysing 1859 Austro-Italian war results at Magenta and Solferino that gave rise to the Red Cross. Bear in mind that doctrinally the Russian line are supposed to advance behind a Jaeger screen (though this was often not followed in the Crimean war, with predictable results).
- But where are these Jaegers? In the Crimean War, every Division has 2 line and 2 Jaeger regiments in two separate brigades, but by 1877 its 4 Line regiments in two separate brigades. No Jaegers are mentioned except the few separate elite battalions mentioned above. But there are some clues:
- One source says that one regiment in each Division is a Jaeger regiment, though when his applies is not clear.
- By 1877, Russian battalions have an entire company of "strelkovy" (skirmishers / sharpshooters) added. There is a hint elsewhere that these may have been combined into battalions or at least opearted together as a skirmish screen in front of an advancing Brigade.
At any rate, from these sets I have some Prussian 1812 Jaeger figures and I want to use them. So I am going to assume that midway through this transition, 1 out of 4 Line battalions are Jaegers, so here is my first 1812 Prussian - I mean 1860's Russian - line Jaeger unit (OK, the shakoes are a bit tall for the "hard" kepi style, so I need to clip the hats down a bit).

As to what sort of troops they might take to the US. If the Circassian and 1877 Russo Turkish wars are a guide, for each Corps the bulk of the force was two line infantry Divisons plus quite a lot of guns (as per Russian usual practice). Attached are typically a handful of Grenadier battalions and ditto a few of the separate Jaeger rifle battalions. Typically a Cavalry Divison is also attached - one Hussar. one Uhlan and one Dragoon regiment. They used well disposed locals as well, as they had in Crimea, the Circassian wars, the Caucasus and in 1877, so they would likely recruit US locals - which should give some entertaining units.
We are going to use Valour and Fortitude rules, there are some ideas from rulesets that have Civil War and Russia armies (such as Principles of War) on how they compare, and we will have to test them out.